
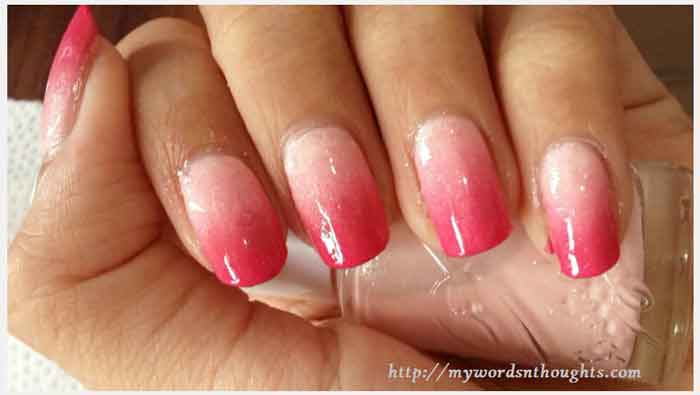
Now nail polishing is an art. Apart from plain shades, now stars, flowers, rain drops, patterns, patches etc have also found place in nails. Now let us try something different. What about giving Ombre style to nails? It’s the latest trend in nail art. It’s very easy, cheap but owns its own style and elegant look. How can Ombre style be done on your nails? Let me tell you how.
Ombre Style for Nails
First – Things needed for nail polish
Two bottles of nail polishes of your favourite colour – one should be light shade, and the second one a bit darker. One white base coat, one transparent fiber coat, nail polish remover, one cotton ear bud and one makeup sponge cut in triangular shape are other things needed.
How to do Ombre style in your nails?
1. Using nail polish remover, clean your nails and areas surrounding the nails.
2. Transparent colour can be used as base coat. Apply it on your nails and wait for 10 minutes to dry.
3. Now take the sponge cut in triangular piece and dip in water. Squeeze off the excess water. Sponge is soaked in water for one particular reason. Dry sponge absorbs nail polish and dries it easily, and hence sponge is soaked to avoid this.
4. In sponge make thick alternative lines using nail polishes, from dark to light or light to dark.
5. In between you can also add a line of mixing both these colours. If so it looks bit different and more stylish.
6. Before you apply it on your nails, do a trial in a piece of thick paper.
7. Now once base coat is completely dry, apply sponge on each nail.
8. After pressing on each nail, apply one more coat on the lines on the sponge if needed, and press on the next nail.
9. You can repeat the process till all the nails are polished.
10. Wait for 10 minutes to dry and apply a glazing finish coat to get an elegant look.
11. Now allow it to dry. Your beautiful Ombre style nails are ready.
12. You can remove extra nail polish outside the nails using an ear bud dipped in nail polish remover.
Note: To get more perfectness, you can stick scotch tape around the nails before you press your nails with sponge. Once the process it done, you can take it off.
Read a few more articles on hand & nail care and nail art too. Here is the page link. Click on the images in the gallery to read.


Recent Comments